| Cleaning up an abused hat | ||
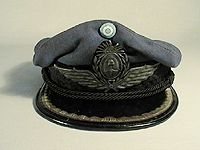
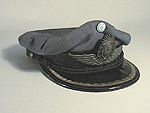
| This Argentine Air Force officer's cap came to me from a
friend in the U.S. It had been sitting on a shelf for years, was crushed out of shape, and
incredibly dirty. Since this is the way a lot of older caps are found, I thought you might
be interested in what I did to give the cap a new lease on life. Usually caps require nothing more than a good brushing to get rid of
the dirt, but in this case, I felt that a more thorough "restoration" was in
order, particularly since both the badge and visor decorations had extensive patches of
green oxidation. As such, I did several things that other collectors may choose not
to—such as re-silvering the bullion on the visor. This is what is known as a
non-reversible repair; in other words, once you do it, it cannot be redone or undone by a
future collector. If the cap you’re working on is extremely rare, you probably ought
to think twice about how far to go in terms of repairs. |
|
|
| Taking the cap
apart Because of the extent of the dirt and other damage, my first step was to disassemble the cap completely. I started by removing the side buttons and chinstrap, followed by the main badge and cockade. All of these were held in place by double prongs which had to be gently straightened out in order to pull the decorations from the frame. |
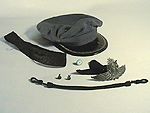 |

Next, I discovered that the hat band and cover could be removed, which I proceeded to do. Now that everything was disassembled, I could assess the damage.
General cleaning
Whenever the cover for the crown can be removed, this is a pretty good sign that it
can be washed. Since this particular crown was made of cotton, I carefully washed it by
hand in lukewarm water and a fabric detergent for wool. After two repeated washings and
several rinsings in fresh water, I took the springing from another hat and stretched the
cover so that it would dry flat. The springing also prevented any unwanted shrinking. The
next morning, the crown was dry and I could iron it to remove any remaining wrinkles.
In many cases, the crown cover cannot be removed, in which case I have had good success using a foaming rug shampoo to clean both wool and cotton. When I get really desperate, I contact my local dry cleaner, who has occasionally worked miracles.
Some caps with white leather or vinyl tops such as many European traffic police caps, can be recolored using white shoe dye if they can't be cleaned with ordinary soap and water. White cotton tops from naval caps can usually be bleached and machine-washed—assuming they're not old and fragile. Always air dry to avoid shrinking.
Reshaping the frame
I use two tools for restoring the shape of a bent frame: a hat form and a travel
steamer. My hat form was made by simply splitting a styrofoam head down the middle, from
ear to ear. I then put thin plywood spacers between the two halves and tape them together
with masking tape. If a hat is large, I use more spacers, if it is small, I use fewer.
At any rate, when the hat fits snugly on the form, I steam the frame with a portable travel steamer. Actually, you could also use an ordinary tea kettle, but the travel steamer is somewhat easier to control. Be careful, though—if you steam the wool crown, it may wrinkle.
The band will get fairly wet during this process, but don't worry. When it drys, the hat should retain it's new shape. If the hat band features colored embroidery, it's probably a good idea to make a test in some inconspicuous spot to make sure the colors don't run. Also, velvet doesn't always react well to the steaming process, and if you touch it when it is wet, you'll leave a mark. Generally speaking, it’s probably not a good idea to use steam with velvet cap bands. As far as possible, use distilled or demineralized water. This helps prevent white spotting.
Repairing holes
in cloth
Although the Argentine cap didn't need any major repairs to the cloth, I've had
others that were more seriously damaged. In many cases, it's possible to pull the two
sides of a tear together by sewing in a spiral pattern. Holes, though, will have to be
rewoven and this can sometimes be carried out quite successfully by dry cleaners who offer
"invisible weaving" services.
Moth holes can sometimes be repaired in this manner, although generally with less success. Tracking—the thin lines eaten by the moth larvae can, however, be filled by treating the bottom of the track with thin, flexible transparent glue (for example Elmer’s) and filling in the track with scrapings taken from the nap of the wool. These are obtained by scraping a less visible portion of the cap with a single-edged razor blade. You fill in the track with the soft fuzz and if done well, the repair is practically invisible. Just to be on the safe side, practice with a worthless hat before attempting repairs on a more valuable item. Also, keep in mind that the scraping method requires a fairly thick wool material to work with. The very thin wool used in WWI US army hats, for instance, is not suited to this kind of repair.
By the way, if a hat shows signs of moth damage, it's often a good idea to put it in a sealed plastic bag along with some mothballs for about three weeks to thoroughly fumigate it before letting it join the rest of your collection.
| The badge In the case of my Argentine hat, the cap badge was badly bent out of shape, particularly the rays of the sun at the top. My first job was to carefully straighten out the bends using needlenosed pliers. Since one of the rays was missing, I made a new one out of a small piece of brass and soldered it in place. I used silver paint with a thin black wash to give the new ray the proper patina. |
|
Next, I had to determine what the badge was made of in order to polish it. I gently tried to remove the dirt and tarnish with silver polish, since the badge looked as though it might have been silver plated. This didn't work, which indicated that the badge was nickel-plated. Brass polish took off the dirt and restored the shine. I discovered that there was gray paint in the crevices to give the badge more depth. Naturally, I preserved this "antiquing." I then polished the edges of the cockade and the side buttons.
Usually, badges require little or no attention and some collectors think it’s a sin to polish silver badges—just as coin collectors will not shine silver dollars. However, I personally don't see that tarnish on a badge adds anything of value. In fact, most of these badges were polished by their original owners when cleaning their uniforms.
Just because silver and brass is old, there's really no reason not to polish it. After all, most folks wouldn't dream of putting tarnished silverware on their dining table, no matter how old it was. Please note, however, that some badges for British caps were purposely allowed to tarnish to prevent sun reflections if the hat was to be used in the trenches or other hazardous duty areas. It would probably be wrong to remove this tarnish.
If there's a lot of dried polish and other gunk stuck in the crevices, this usually means that the badge can and should be polished. I let the badge soak for about 15 minutes in soapy water to soften the dirt and then use a toothbrush to clean things up. After repolishing a badge, I generally wash it again to remove any polish I may have added. I then do the final polishing with a dry dish rag or paper towel.
The exceptions to the rule are gilt badges since the gilding is easily polished off if you're not careful. About the best you can do is to wash a gilded badge in lukewarm water with a little dishwashing detergent. Sometimes gentle rubbing with a little diluted lemon juice will help brighten the gilding. Make sure to wash off all the lemon juice afterwards or damage may result.
In most cases, it’s not possible to remove a badge without bending the small prongs with which it is attached. If you prefer not to remove the insignia, it’s usually possible polish parts while they are still mounted. Simply slip a piece of thin cardboard—like a file card—behind the object to prevent the surrounding cloth from being soiled. If you cut slits in the cardboard for the prongs, you should have no trouble slipping it in behind the entire badge.
The visor
The visor and hat band on my Argentine hat were wiped down with a damp rag. If any
sticky residue remains on the visor from price stickers, etc., the glue usually comes off
with a little petroleum on a rag. Don't use paint thinner, rubbing alcohol or other
thinners since these can ruin the shiny surface of the visor.
In some cases, the visor has been badly scratched or otherwise damaged. It is possible to repolish a visor (even a plastic one) with Kiwi shoe polish. I use the old Army "spit and polish" technique, putting on a fairly thick layer of shoe polish and working it into the cracks with a rag dipped in water. This will often work miracles. If you polish with a nylon stocking, the heat from the nylon will actually fuse the polish to the visor. The shine is exceptional!
The Argentine visor had two problems. First, the silver bullion decorations were green with oxidation. Second, the edge of the visor had some nasty chips.
The second problem was the easiest to fix. I simply took some thick black enamel paint and filled the holes. I then wiped the edge with my finger to remove any paint that had run onto the undamaged surface. This repair is virtually invisible.
Under normal circumstances, I don’t mess with tarnished bullion. However, in this case, the damage was worse that I was willing to accept. Chats with my local uniform maker, Carl Seifert, and a curator at Třjhusmuseet (the Royal Danish Military Museum) yielded an interesting "trick of the trade"—paint it. Apparently this is widely practiced if bullion decoration has been damaged.
To do this you need four things: a very fine camel’s hair brush, some high-quality metallic paint of the correct color(turpentine-based), a steady hand and outstanding eyesight. The idea is to carefully run thin paint between the bullion threads, finishing off by brushing across the strands so that the paint doesn't fill up the tiny spirals in the individual threads. This is an exacting process that can take several hours, but I think the results are often worth it. The Argentine visor was restored in about an hour and a half, since this was a fairly straightforward pattern. I used my finger to burnish the tops of the threads, which removed some of the "newness" of the repair. I work under a magnifying glass to see what I'm doing. If things look OK under the glass, they invariably look GREAT when viewed normally.
Occasionally, navy caps have visor decorations made out of solid brass wire. These can be carefully polished with Brasso and a cotton swab. Just be careful not to get polish on the surrounding felt, or you’ll end up with a white spot that's nearly impossible to wash off.
Keep in mind the concept of reversibility. Painting the bullion is NOT reversible, so think twice before touching up a rare or historically important cap. Also, beware of ordinary caps with silver bullion that have been upgraded to general rank with a coat of gold paint. I’ve seen several WWII German caps that have been doctored in this manner.
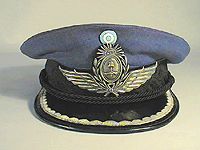
| Putting it all
together The first step was to reinstall the crown. Although the lack of springing gave the Argentine hat a rather jaunty appearance, I thought it looked just a bit too salty, so I decided to replace the missing springing. Next I reinstalled the hat band, making sure that all the original holes for the buttons and badge lined up with the holes in the frame. The original badge had a wool backing, which was rather ragged at the edges. I cut off the loose threads with a scissors and tried it on the badge. Not surprisingly, I had to do this a couple of times since the backing was not cut exactly symmetrically and would only line up correctly with the pins on the badge in one way. |
I then straightened the pins on the metal items with needlenosed pliers, and reinstalled the parts on the cap, though without bending the pins into their final position. I then remounted the chinstrap.
When everything was lined up and adjusted to my satisfaction, I bent the pins to fasten everything permanently. Since these pins are quite fragile, it's not a good idea to bend them more than absolutely necessary. A "dry run" is therefore a good idea—and by installing the chinstrap before fastening the buttons, I made sure that there was ample room behind the buttons for the thick braid.
And that, my friends, was that. Hope you like the results.
|
|